The DIY Kayak Trailer- How to Build An Easy Homemade Kayak Trailer
In this Guide
If you own a kayak, then a kayak trailer is a must for you, given that carrying it around is a hassle. Instead of canceling your plans, one can buy a kayak trailer or build their own homemade kayak trailer. This is imperative given that carrying your kayak up on your car roof and strapping it down is difficult without any extra assistance. For all kayak owners, especially with multiple kayaks or smaller vehicles, having the right kayak trailer setup is increasingly important.
With these implications in mind, people often invest in pre-built kayak trailers or expensive kayak roof racks that cost up to $1000. Given the high costs of these products, it might be a better decision to build your own homemade DIY kayak trailer for added convenience to your next ultimate kayaking experience. The question hence arises as to how do you build a kayak hauler?
Building your own DIY kayak trailer demands meticulous effort; however, once it is built, you can save up to $600! So, if you want to build your own DIY kayak trailer and need a step by step guidance!
Are you sure you still want to invest in a $1000 pre-built kayak trailer setup? If not, we will show you how to construct an easy DIY kayak trailer here.
Step 1
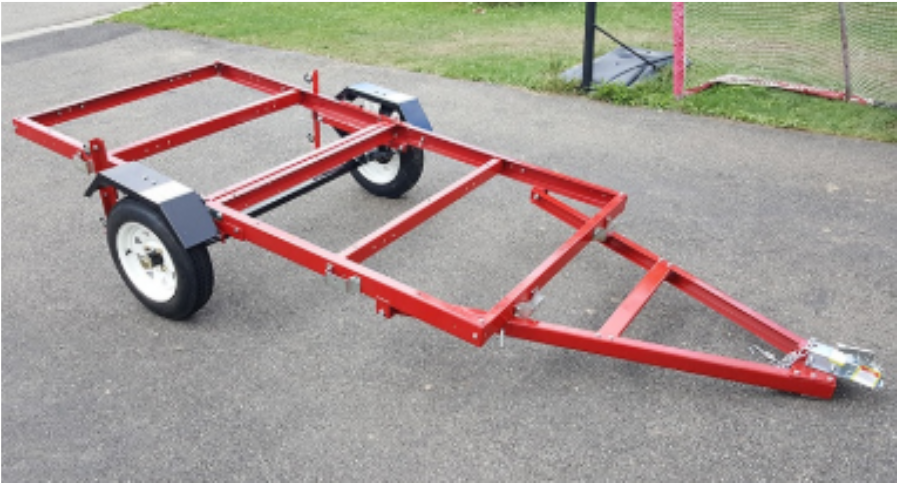
Firstly, you would need to collect all the necessary materials to build a kayak trailer. Get a Harbor Freight Trailer Kit to start with. By keeping in mind the size of your kayak, buy the trailer kit. However, you can also use an old trailer as well.

Another cheaper substitution for a harbor freight trailer is the Utility Trailer Kit from Ironton. You can choose whatever fits your pocket. In addition to the trailer kit, you would need some other things for this project as well, such as:
- 10’ 11ga 2” square tube
- 14’ 1/8” 2” angle iron
- 2 6’ pieces of 1.25” round tube
- 4×8 sheet of 1/2” treated plywood
- 2 12’ 5/4” deck boards
- 2 8’ 5/4” beck boards
- 4 10’ 2x4s for bunks
- 7 eye bolts for tie-downs
- 6’ wire for harness extension front braces are 3/4” steel bar
Step 2
Assembling the Kit
Start by assembling the kit, make sure you square the basic frame. Check several times while you are tightening since the entire build is based on this. Once you are satisfied with the build only then move to the next step.

Now add a brace to connect the tongue directly to the spring hangers. A brace is a piece of 2” angle iron lined up with the front spring holes. Turn the frame around so the axle centerline would be farther forward as you will need to extend the front. This will make weight distribution better and is easier to pull and track.
Step 3
Grinding
Grind off all the powder coat on the joints and then do some welding. If you want a longer bed to haul all your camping gears and coolers, add some extensions.

Extensions are typically 2’L each and are made from the angle iron. This will make the bed for the trailer approximately 6′ long.
Everything is tacked in place now and is ready to square. Use the original tongue for the front brace since you won’t be using it for its intended purpose. Now hit the welds with primer and weld all the connections together including the spring hangers to the brace and the rear hangers to the frame.
Welding

Step 4
Get the tongue bolted with grade 8 bolts and start welding it. Weld all metal to metal connections first. If anything happens and you have to leave the welding process unfinished, please always cover the connections with a light coat of primer to protect from rust.

You might also want to fill all the remaining holes that you will not be used for building the trailer. It is not necessary but sometimes they can be a little inconvenient and don’t look good either.
Step 5
Priming
Put the front upright now using some scrap. You can also add a sleeve over the tongue to beef up where all the weight will be (this is optional). Put some primer on the entire trailer to keep the welding protected.

Step 6
Now it’s time for more grinding, priming, and sanding. If you missed a spot or welding is disturbed from somewhere, now is the time to do it again. Finish off with the primer and let it rest for a few hours.
Step 7
Painting
Time to start painting now. Choose the color of your choice for the upfront trailer. But for best protection, hit all the sides (bottom, tongue, etc.) that will not be visible with an oil-based black paint.
For the top side, start with the coat of a metallic silver coat to give it a bright finished look. Now use the color that you have chosen for the final color. It can be red, blue or any other you want, put a minimum 2-3 coats to make it long-lasting. Now finally the time for a clear coat to make the final look shiny and neat.
Laying the Deck
Next up, lay the deck on top of the trailer that will keep your kayaks steady. You can use plywood which is inexpensive and works well. Make a diagonal cut in your decking to expose this and allow your deck to lay flat to the frame.

Now, clamp the deck to the frame. You can even paint the deck now.

Step 8
Setting Up the Side Rails and Straps
Time for the coupler on with grade 8 bolts. Add the front eye bolt, tie it down and start wiring. Next up is side rails and axle installation which is pretty straight but you can refer to instructions for axle setup.
Once the side rails are up, it is very easy to strap down the kayak.

Once it is all assembled on the trailer, you are ready to use this trailer for your kayaking adventure!
Trailer Budget
|
Materials |
Cost |
|
Harbor Freight Trailer |
$239 |
|
No Weld Trailer Rack Bracket Kit |
$97 |
|
24’ stick of 1.5”, 120” wall square tubing for rack |
$81 |
|
10’ length of 2.5” square tubing for an extended tongue |
$55 |
|
Miscellaneous hardware and paint |
$17 |
Total Cost: $489
Congratulations, you have just saved almost $600!!
For further assistance, watch these videos to build your very own DIY Kayak Trailer.
Here’s another link that can help you set up a kayak trailer.